Saturday, 07 April 2012
Back on the 22nd of January, I complained that my Viewmaster projector had once again run out of batteries. The projector, which finds frequent use as a way for Owen and me to polish off the evening, uses 4 C-cell batteries. A pack of these batteries is kind of on the pricey side, and I’ve often had to buy more than one pack a year. I would estimate I’ve spent about a hundred bucks keeping this thing powered over the years.
The problem isn’t just the high cost of replacing the batteries, though. The projector works great when the batteries are new, but the power rapidly fades. At some point, we are essentially reduced to trying to figure out what a projection is trying to show us.
And here’s the real stupid thing: the projector has no AC-adapter. I mean, I can certainly see the appeal of rigging the device for battery power – then it can be used easily , perhaps even while camping. But why didn’t Fisher Price make the projector work with both battery and plug-in capabilities? I view this as an enormous design flaw on something that is not mobile.
If you look back at the blog post where I first whined about this, you’ll see the first comment was from my friend David, who suggested I rig it for plug-in capabilities myself. I kept this idea in the back of my mind and, when the batteries failed again, I tossed the Viewmaster in my car determined to not use it again until I could plug it in.
I couldn’t find a good DIY explanation online, so I emailed David for more info. He was able to supply me a couple of links. They got me started. I saw what I needed – primarily, I needed a plug of similar wattage. I remembered my old cell phone charger and calculated that this would be a close match. I then took the plug and Viewmaster to Radio Shack where an employee there knew exactly what I was trying to do and what I would need. In fact, I was glad to talk with him because the links David provided talked about rigging a baby swing from battery to plug-in (that’s another battery-devouring device), and though a swing is similar, it’s more complicated. The employee suggested I buy a screw-on power jack for the plug, and solder on a nice receptor. I didn’t think these were necessary, but I agreed it would make the device look nicer, so I bought them.
Well, that was Tuesday.
Today, I soldered for the first time. I watched a couple of videos on YouTube – like THIS ONE and THIS ONE to make sure I had some idea of how to use a soldering iron.
I was a little nervous to cut the wires on the Viewmaster, but as soon as I soldered on the new wires, I touched the plug’s wires to them and ensured that the power was flowing. It was! After that, I was more confident, knowing that no matter what I did from this point on, at least I could just twist the plug’s wires to the soldered Viewmaster wires to get it to work.
But I needn’t have worried. I soldered on the detector, drilled a hold in the bottom of the projector, screwed on the power jack, and soldered the wires to the inside of the jack.

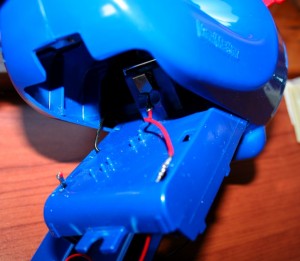
Here are the guts of the projector. I cut the red and black (barely visible at left) wires and soldered longer pieces of wire onto them, then wove them through the battery holder (you can see the red wire at bottom right coming through the holder).
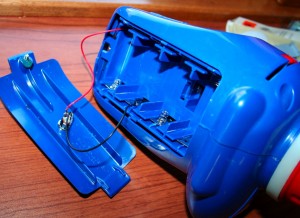
 Here I’ve reinstalled the battery pack, and soldered the wires to a power jack. As mentioned above, I drilled a hole in the battery pack cover and screwed this jack onto the cover.
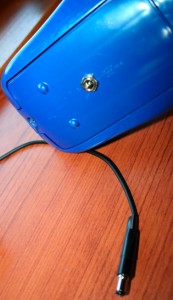
 Here, I’ve screwed the cover back onto the projector. You can see the power jack right in the center there. The bottom half of the picture shows the detector plug, which I soldered to the two wires coming out of the phone plug.
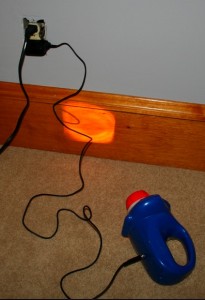
 The (former) cell phone plug is now plugged in. The projector is on – completely sans batteries! As proof, notice the square of light against the floor board.
This evening, my son and I watched three Viewmaster reels – a set of Godzilla reels (his choice). Full power! Bright, clear images! Success all around!


