As of this week, we’ve lived in our home for 5 years. As I’ve done semi-annually since we moved in, I will hereby provide an update on improvements we made to our home in the past six months.
By the way, if you’re interested, here’s the blog post detailing what we did during the six months prior to these most recent six months.
OWEN’S ROOM
-Installed a new valve on the radiator.
A friend of mine came over and helped me replace the valves on 8 radiators in the house. We replaced 6 of them in July and, a few weeks later, the two others in August. So, there’ll be a bit of repetition here…
ISLA’S ROOM
-Installed a new valve on the radiator.
ADULTS’ ROOM
-Installed a new valve on the radiator.
UPPER BATHROOM
-Installed a new wax ring under the toilet.
Everyone I spoke to about this project, including an employee at the hardware store, claimed that this was such a difficult task that it wasn’t worth it unless my toilet was actually broken. They said toilets are phenomenally heavy, I’ll get water everywhere, I’ll make a terrible mess removing the old ring, and it will be really hard to get a proper seal when I’m done.
Turns out, this is all untrue. I removed 95 percent+ of the water from the toilet before I began removing it (get this: there’s actually a way to flush the water out of a toilet). I also removed the tank from the back, which added about 15 minutes to my task, but it meant the toilet was now in two easier-to-lift pieces. The toilet was heavy, but not impossible to lift. In fact, I – by myself – was able to hoist the toilet over the side of our Jacuzzi and set it in there while I worked (that way, any remaining water would simply run down the tub drain). As I suspected, there wasn’t much of a ring remaining, but I scraped it off while wearing disposable gloves and put it all into a plastic bag. The mess wasn’t that bad at all. After reassembling the throne, I dropped in a dye tablet that detected any leaks. There weren’t any. If you need to change out the wax ring on your toilet, let me know, I’m there for you.
-Replaced toiled seat.
Granted, this was a considerably easier task than the wax ring replacement.
-Installed a new valve on the radiator.
UPPER STAIRWELL
-Installed a new valve on the radiator.
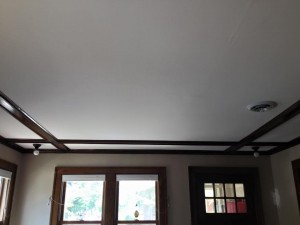
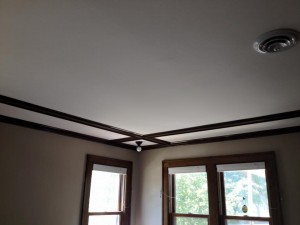
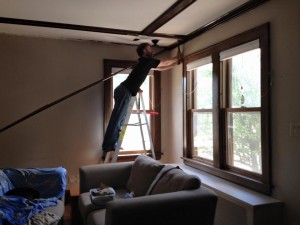
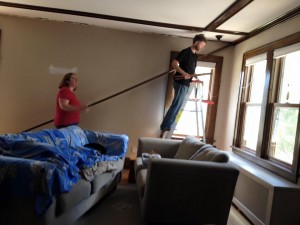
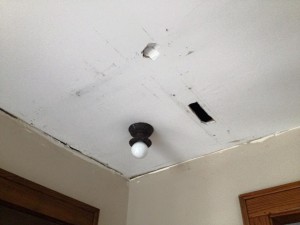
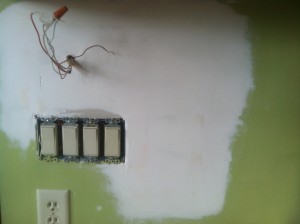
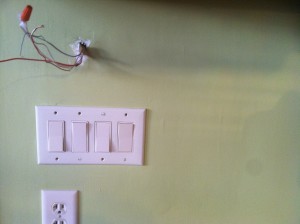
LIVING ROOM
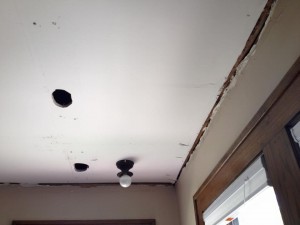
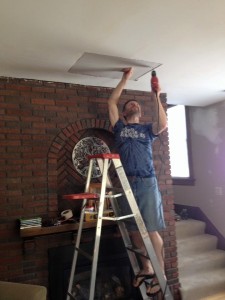
-Removed molding from ceiling.
These first three photos show what our ceiling looked like since we moved in, and the other two show us removing the molding:

-Installed a piece of sheetrock and several patches and taped and mudded ceiling and walls to fix holes and cracks.
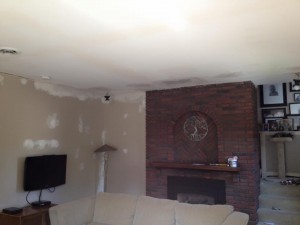
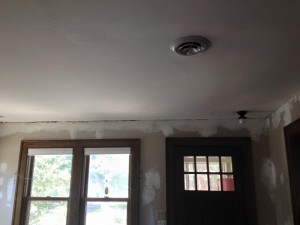
These two items are a project that’s still in progress. We hope to get all that mud sanded, and then paint the walls sometime in the next couple of months.
-Replaced all outlets, switches, and accompanying covers from the old, cream color, to the fancier white.
-Installed a new valve on the radiator.
DINING ROOM
-Installed a new valve on the radiator.
KITCHEN
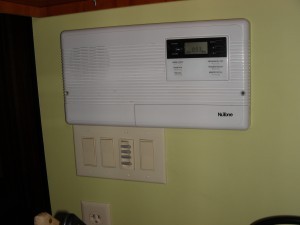
-Replaced the doorbell.
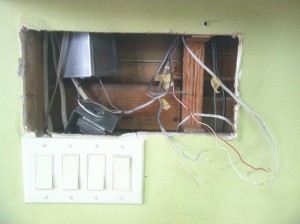
What I mean by this is the actual mechanism, not the buttons on the outside of the house. Here’s what our doorbell system looked like originally:
And here’s what it looked like on February 7th, right after I removed the ugly one that came with the house:
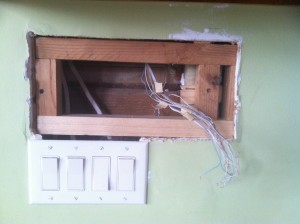
And here’s what it looked like on February 21st. I had to build a frame around the opening so that I had a place to secure sheetrock (since the new doorbell isn’t as large as the old one):
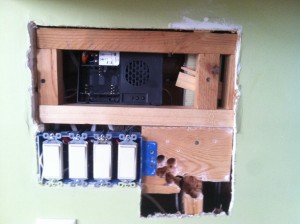
And here’s what it looked like on March 1st. Yeah, it looks worse. That’s because the wall to the right of the light switches needed some repairing, too:
And here’s what it looked like on March 25th. The new piece of sheetrock is installed, and we’ve taped and mudded. And mudded. And mudded…
This picture was taken on April 30th. The mudding and sanding is done. Or, at least, it’s as done as it’s gonna get. All ready for painting:
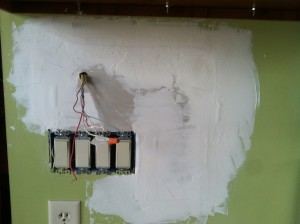
This picture was taken on May 12th. The wall has been painted, and the light switch cover has been replaced. The only thing left is to hook up the doorbell:
And here’s what it looked like on May 14th. All done! Just in time for Owen’s birthday (I set the doorbell to play “Happy Birthday” that day):

-Installed a new valve on the radiator.
MUDROOM
-Installed light in closet.
LOWER STAIRWELL
-Removed accordion door.
DOWNSTAIRS BATHROOM
-Installed new toilet seat.
-Replaced outlet and light switches and covers.
Again, went from dirty old cream to flashy white.
YARD
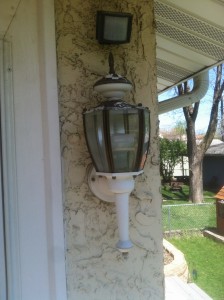
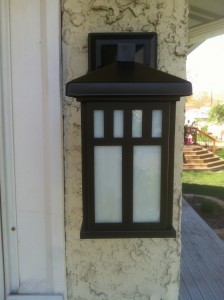
-Swapped old, rusty, ugly light fixtures for newer models.
I replaced the outdoor light fixture on both our front and back doors on April 22nd. Here’s a picture of the back door’s original fixture, at left, and the new model, at right (the front door’s models look the same):
-Installed wire mesh around chimney.
Okay, not me personally. I’ve actually never been on the roof of my house. But I hired a guy, and he pulled out a large plant that was growing in the chimney, and he affixed a wire mesh around the opening to prevent squirrels from going inside of it (which they were doing).
-Had air conditioner unit serviced.
So, not much in the way of visual appeal here, but at least the unit is super clean (it was really dirty) and it has a brand new motor. Oh, and AC motors are crazy expensive.
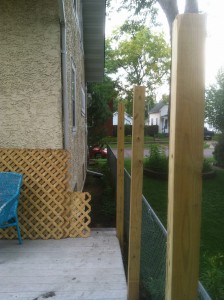
-Installed lattice work on south side of deck

This makes a nice barrier between the deck, which has no railing, and the air conditioner. Emmett, for one, likes to jump on the AC, so hopefully this will prevent that. It also provides a bit of protection in case someone (Emmett!) isn’t paying attention and falls off the side. It affords a bit of privacy, too, from those pesky neighbors walking on the sidewalk who insist on saying hello as they pass.
-Installed beams on north side of deck.
Uh, okay, so this might seem a bit odd, but that’s because, like the work in the living room, this too is unfinished. Jennifer and I intend to install the lattice work you see leaning up against our house, but before we do that, we had to put in these 4×4 beams. We did that just this week. so, I’m very confident that this will be completed soon – it’s just that it will happen to fall in the next Home Improvement update I give.
-Removed retaining wall.
As one of the most pressing issues facing our yard, we needed to repair or replace our old retaining wall – the big one that stretches over 75 feet along the length of the south side of our yard and wraps around to the west side an additional 6 feet. This wall was coming unglued and has been slowly leaning more and more toward the sidewalk with each passing year. Really, it’s been a danger to people who walk on the wall. It’s also ugly. We’d also like to put a fence on it, but we can’t do that until the wall is fixed.
Like the lattice work project above (and the living room project way above), this is a project that is straddling two six-month periods. In fact, as I type this, there is a team of professionals working on the bricks right now. Here’s a collage of photos showing the work they’ve done so far:

Here’s the view from the second story:
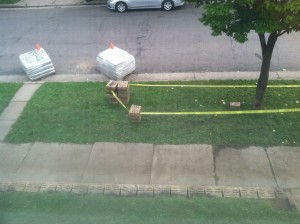
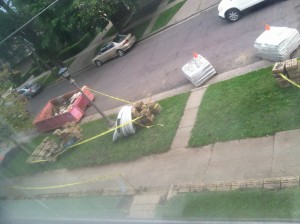
This project should be completed by mid-month, so expect photos of the completed work in my next Home Improvement update.
-Removed brick from the ground under the retaining wall.
Yeah, I’m not sure why, but under the retaining wall that wraps around the air conditioner unit, there was one square brick at ground level. Removing one brick sounds easy, but it was under three layers of bricks. So, I had to temporarily remove 13 bricks just to get at this one brick.
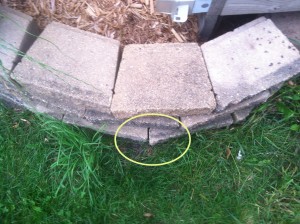
The brick was in the ground right here, where I circled. I swear I took a before photo, too, but I can’t locate it. I pulled it out in about 20 seconds, and then spent another 20 minutes filling in the hole it left and ensuring all was level before I replaced the other bricks.
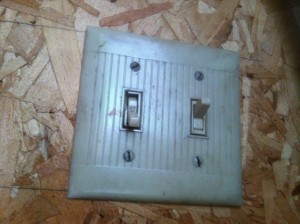
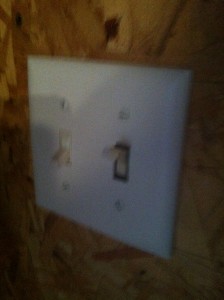
GARAGE
-Changed out the old light switch.
At left you can see the old model. Some dirty, nasty, corrugated plate on top of two switches one of which (the one on the left), didn’t even stay up anymore.
At right you can see the replacement. The one on the left now works fine, assuring me that I can turn on the garage’s outside light with confidence! The one on the right, meanwhile, which is for the garage’s inside lights, actually has a nightlight on it so that I can see it in the dark.